Thursday, March 31, 2011

Wrist Bling Rescue

How is your week winding down?  I was happy to see a little sunshine today.  It's been so deary and rainy here lately.  Bring on the sun! 


Do you have some jewelry that is a bit scratched up or tarnished?  I had a little bracelet that was getting too scratched to wear.  I thought today, why don't I reinvent this?  Here is what I came up with.


Pretty cute huh? 

I originally bought the plastic bracelet off
the clearance aisle at our local WalMart.  
They had a bunch of them (now I wish I had bought more)
marked down to 39 cents. 
After a few wearings the silver had some scratches on it. 
Here is the before.


I really had not worn it since the scratches. 
 I had some supplies on hand, zebra duck tape,
cute letters and my trusty E6000.


I began covering the bracelet with the zebra duck tape. 
I overlapped a little on the ends. 
Since the bracelet has a curve on it. 
The tape was wrinkling up a bit.  I decided to clip every 1/4 inch
around the edges to fold it down. 


This helped quite a bit, but it still just wasn't smooth enough. 
 I thought I would try heating it up some. 
So I stuck it in the microwave for 10 seconds.  T
his softened it up enough to smooth out the wrinkles
and as it cooled it made the tape stretch better over the bracelet. 

The next step was putting on the bling. 
I had some letters "HOPE". 
This word means so much too me. 
 So much that I have avoided blogging
about it for fear of not doing it justice. 

I have a Styrofoam cutting tool that I heated up
to make holes in the bracelet. 
I think you could heat up a skewer,
pin, or nail to make a hole also. 

Once the hole was made, I used the wire that came on the letters,
securing them to the card, to thread through the hole
and then used the E6000 to glue the wire down. 
Next, I covered the inside of the bracelet with the duct tape.


That is it!  Presto chango!  New wrist bling!

I can't wait to wear it and see how many compliments I get. 
Maybe they will ask me where I got it ;)!?

I have been so blessed here of late.  I want you all to know that I am so honored and excited by all the sweet comments you have left.  Each of them lift my spirits and gets the creative juices going in full gear.  Thank you all so much!!  I wish I could give each of you a hug!!!!!!!!!!!!!!!!!!!

barbwired blessings to you and yours!!!


It is time for some parties!


Wednesday, March 30, 2011

Reclaim


Happy Wednesday barbwired besties!  Today we are going to do a reclaim craft.  I think it is lots of fun to find something interesting, quirky, or even ugly and make it great. 

I was at a Savers location and found a dingy daisy picture for $2.99.  I looked at it and walked on by, then I came back and thought the wicker frame was pretty interesting. 


I have to tell you I am pretty disappointed
that I have lost my before picture. 
Whine!  But alas, it is saved somewhere that I can not locate it. 
This is as close to a before picture as I can get. 
I had already applied some spray paint. 
It took a really good bleach bath before that. 
This thing was fairly nasty. 
The back of the picture says HOMCO. 
From research I can tell you it is about a 1970's piece. 


It is all one molded piece of plastic. 
Originally it was white wicker with the daisy print inside. 
I make a fun chalkboard out of this beauty in the rough. 
I decided on turquoise for the color.
(It also would have been fab in hot pink for a little girls room!) 

It has a deep ditch between the wicker and the pic. 
I taped off the area for the chalkboard paint.


I used this chalkboard paint. 
We had used it on the barbwired beauty's room redo. 
So, we had plenty left over. 


Even though I tried to be careful, the paint fell in to the ditch.


I had to decide what I was going to do about that!

But in the meantime, I wanted to wash the wicker to
bring out the variations. 
I thought about a antique wash, but was afraid it
would dirty it up too much. 
So, white wash seemed the way to go. 
I applied a mixture of white acrylic paint
and water and then wiped it off. 


As you can see, that step is really messy. 
Please just ignore those white washed hands!

I tried many options for the dirty ditch cover-up.
Ribbon was the best looking option. 
I applied a brown and blue polka dot ribbon to cover the mess ups. 


The ribbon also helped make it even cuter! 
This also gave me the idea for the chalk. 
 I used the same ribbon and threaded it through the wicker. 
 I used my Gator to attach a grommet to the ribbon. 
Then hot glued the ribbon to the chalk. 
I can simply attach another with the handy dandy hot glue gun. 


We are planning on hanging it in the kitchen to have it
available for grocery lists, notes, appointments and scriptures. 
It is such a change from the before. 
Again, I wish there was a before pic!! 


By the way, that scripture is near and dear to me! 

Let us never forget that sometimes, people need to be
reclaimed just like these dingy little pictures.  Maybe we
need to pick them up, help them clean up the messes
in their lives.  Give them a new perspective on life.
Maybe we need to do it for ourselves, or for someone
dear to us.  Reclaimed people can become just as beautiful
just as precious and useful.  Never forget to forgive and move
forward.  Create a new heart each day. 
Give it to God, He loves to reclaim hearts!

barbwired blessings to you all!!!!!!


♥ these linky parties!


Monday, March 28, 2011

The Results Are In

Welp, we went to the Pinewood Derby and brought home 3rd!  I am so proud of the barbwired boy!  Good sportsmanship, good competitor, just an all around good boy.  I may be a bit on the prejudice side...maybe.

It is always good when  you can be proud of your kiddos.  It is never good when you have your heart in a million pieces over bad choices they have made.  Last week was a  week of ups and downs.  Please pray for the barbwired bunch when you talk to the Big Guy. 

Enough of that negative!

Look what I found...a vintage chocolate sign.   What do you think?  Do you love it?


Ok, ok I have to fess up, I made it. 
Here is what it looked like BB (before bunny). 


I got two of these frames from a friend who was going to garage sale them. 
She thought maybe I could use them for something.  So price for frames, $0.

I took this frame apart and cleaned it up.

Then I went to Graphics Fairy.  LOVE your site by the way! 
You can find it here.  I was able to find these darling little images.


and I then found this image of a stamp


I took the glass from the frame and laid it on my light box. 
I then positioned the first image under the glass and taped it all down. 
I began tracing the image with brown and copper acrylic paint . 
 I did this in a reverse image. 
Outlining the basic image first, then going in to add the shading. 


I did not want all of the image, so I only traced the area that I did want. 
Once that was traced I painted in the colors.  
Next, I removed the first image and added the picture of the bunny. 
I centered it in the frame created by the previous image. 
 I did the same steps, outlining then coloring. 


Finally, I placed the advertising lettering under the glass in reverse. 
This way the lettering would not be backward. 
For this, I used paint pens of black and brown. 


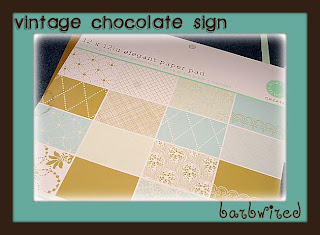
Once all the paint was dry, I chose a paper from this
Martha Stewart collection as the background.


I cleaned the glass around the image
and placed it on the paper and reassembled the frame. 


It was a fairly quick project once I chose the graphics. 
I did not exactly following the lines, so that freed up some stress of being perfect. 
I wish I could free hand these things, but since I can't, I'll trace.  LOL


I thought I would hang it with some ribbon.
I even made a ribbon flower that coordinates. 
Then (cause I can't figure out when to stop)
I added some small ribbon flowers to embellish the frame.


Now this makes me want a real chocolate bunny!


I attempted to look up the translation of the french advertisement. 
 I can't get all of it, but it says something about Payraud Cocoa, Take 'lunch in sheets.
Product has no rival.  Something like that... if I have any friends
who can translate it, comment please. 


Barbwired Blessings to you !


Linky Love to:


http://www.skiptomylou.org/


Saturday, March 26, 2011

Pinewood Derby!

Today we are preparing for the most exciting Pinewood Derby!  Yesterday barbwired boy and hubs put the final test to the derby car.  They have declared it a winner, naturally.  Wish us luck as we go compete today.  We love the whole process of pinewood derby, from the selection of a style to creation to the race.  Last year the barbwired boy won 2nd place.  He is predicting a first place win this year.  Good Luck Brayden!!


Barbwired's beavy of beauties also know as followers..... Today is the last day to pick the prize you want.  In case you missed the post, look here.   Just want you darlings to know I love having ya here with me!


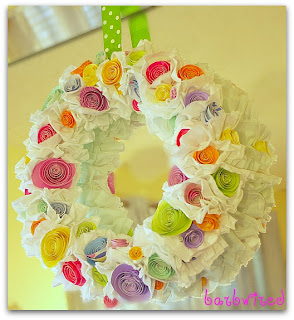
Now let's get some spring and Easter in this barbwired nest!  How about this?


I wanted something light and soft. 

I began the process by making the paper flowers. 

You probably all know the steps but here is a quick tutorial. 


I made these in all sizes. 
I used everything from salad plates to pill bottles to draw my circles. 
They are super duper easy. 
 I had paper that had a pattern on one side and a coordinating solid on the other.  
I used both pattern and solid for the centers. 
Once you feel you have enough of these, it is time to move on to the ruffles.

I ♥ ruffles! 

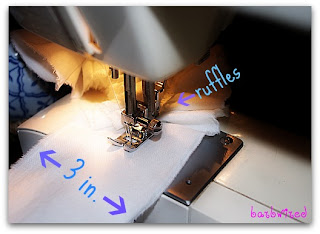
I took a soft white fabric and tore three inch strips. 
I wanted to tear them to get a frayed edge. 
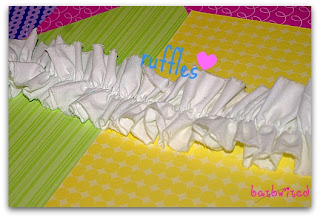
Then I used my machine to create the ruffles. 


I made eight ruffles. 
The went from 3 inches wide and 3 ft long
to about 2 inches wide and 1 foot long. 


I had a styrofoam wreath. 
 I used the ruffles and a hot glue gun,
wrapped the ruffles all around the wreath and hot glued them on.


After covering the wreath with ruffles, I began hot gluing the flowers on. 
I nestled them in the ruffles.  I went from large size flowers to smaller. 


I then applied a polka dot ribbon with the hot glue to hang the wreath.


I decided to hang it on a large mirror in our living room.


Ruffles, flowers, polka dots...what could be better!!
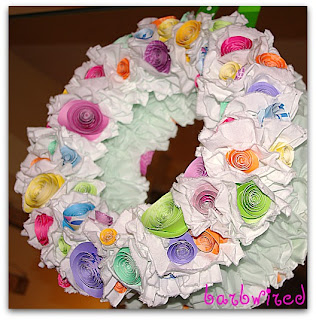
It makes me smile!!!


I hope you like it too!


Now off to the derby! 


Barbwired Blessings to you!!!


Got a party going on at:


http://funkyjunkinteriors.blogspot.com/


http://www.simplysweethome.com/


http://iheartnaptime.blogspot.com/


http://www.flamingotoes.com/


http://www.skiptomylou.org/